Getting dependencies
Make sure you have the following dependencies available:- A Linux, macOS, or Windows machine
git(used for source version control)- An
sshclient (used to authenticate with GitHub) goandrustsetup on your local machine (used byflowandnexusrespectively)
Getting the source
Run the following steps to set up your environment:- Configure your machine with an SSH key that is known to github by following the directions here.
- Clone the repo locally using
git clone --recursive git@github.com:PeerDB-io/peerdb.gitcommand.
Setting up Postgres
- Install and run postgres, installation depends on your platform.
- Check the status to ensure postgres is running.
- To check if postgres is installed, run
psql postgres. To set up a dev environment, it is important to have a user named postgres because end-to-end tests usepostgresuser - You can download pgadmin or any other postgres-compatible viewer for GUI-based interface.
- Following the prerequisites to setup real-time CDC using postgres, connect to postgres using psql CLI and run the below commands -
- To change
wal_levelto logical, runALTER SYSTEM SET wal_level = 'logical' - To change
max_wal_senders, runALTER SYSTEM SET max_wal_senders = 10 - To change
max_replication_slots, runALTER SYSTEM SET max_replication_slots = 4 - Restart the postgres instance using
brew services restart postgresqlto reload the configuration for the changes to take effect. - To verify the information, run the following commands -
- Check if
wal_levelhas been set to logical, runSHOW wal_level; - Check if
max_wal_sendershas been set to 10, runSHOW max_wal_senders; - Check if
max_replication_slotshas been set to 4, runSHOW max_replication_slots;
Setting up Bigquery
You should have a GCP account and Project set up. The Project should be associated with a billing account. If you don’t have a credit card, you can set up the bigquery sandbox by following the instructions here. We will be using a Service Account and Key file to authenticate bigquery from our local machine.Creating a Service Account
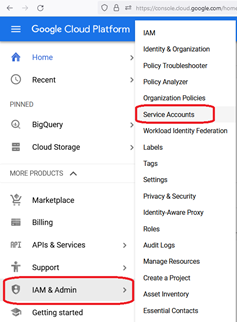
- From the Google Cloud Platform Console click on the options menu (three bars in the upper left corner), Select IAM & Admin and then Service Accounts from the fly-out menu.
- Click on the Create Service Account button.
- Fill in the service account name. The Service account ID will be generated based on the service account name. Click the Create and Continue button.
- Add the below roles:
- BigQuery Connection User: This will allow your external application to make connections
- BigQuery User: This will provide access to run queries, create datasets, read dataset metadata, and list tables
- BigQuery Data Viewer: This will provide access to view datasets and all of their contents.
- BigQuery Job User: This will provide access to run jobs
- When done Click Continue button.
Creating a Key File
- Once the service account has been created, all of the service accounts will be listed. Click on the account just created on the list.
- Click on the tab for KEYS. Then click the Add Key button. Then click on the Create new key option.
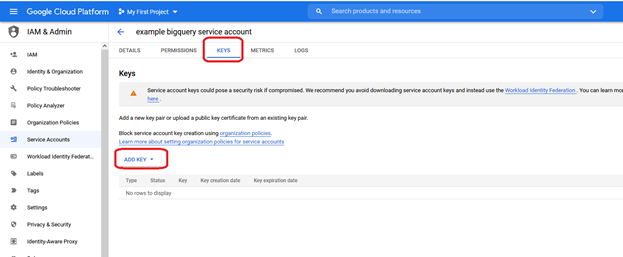
- Choose the JSON file type and click the CREATE button.
- The Key File will be generated and then your web browser will prompt you for download.
- Open the xxxx.json in a text editor, and change the “type”: “service_account” into “auth_type”: “service_account”.
- Add the line “dataset_id”: “e2e_test_dataset” at the end to run e2e tests for peerdb.
- Rename the json file to bq-creds.json
Configuring BQ as a peer
To configure bigquery as a peer, you will have to modify the environment variableTEST_BQ_CREDS to point to the path of the JSON file. If you are using VSCode, you can add the below entry under settings.json file.
Setting up Snowflake
You should have a Snowflake account and warehouse set up. If you don’t you can sign up for a free-trial and create an account with Snowflake. Your role should have enough permissions to create a database, schema and tables. PeerDB uses snowflake’s key pair authentication. Please follow the steps below -Configuring Key Pair Authentication
- To generate a private key in p8 format, run
openssl genrsa 2048 | openssl pkcs8 -topk8 -inform PEM -out rsa_key.p8 -nocrypt - To generate a public key with respect to the above private key, run
openssl rsa -in rsa_key.p8 -pubout -out rsa_key.pub - Copy the generated public key into the keyboard, either using pbcopy or manual copy-paste.
pbcopy < rsa_key.pub - To assign the public key to a snowflake user, run,
ALTER USER jsmith SET RSA_PUBLIC_KEY='MIIBIjANBgkqh...'; - Verify the user’s public key fingerprint,
DESC USER jsmith;
Creating a Key File JSON
The JSON used to authenticate snowflake from inside peerDB is of the below format --
account_id:<organization_name>-<account_name>. You can find this information under Admin Page -> Accounts.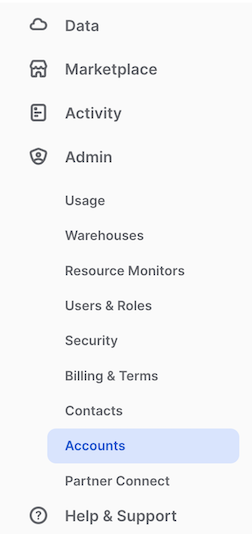
-
username:<user_name>. Go to Admin -> Users & Roles -> Users, find the relevant user_name -
private_key: <string_private_key> The rsa_key.p8 file generated in the above step needs to be converted to string, which means all new lines should be converted to the “\n” symbol. -
database: “peerdb”. Create a new database. You can use an existing one, but make sure your role does have permissions to read/write to the database. -
schema: “peerdb” -
warehouse: “COMPUTE_WH” or whatever is available under Admin -> Warehouses -
role: “ACCOUNTADMIN” or whatever is available under Admin -> Users & Roles -> Role -
query_timeout: 300
Configuring SnowFlake as a peer
To configure snowflake as a peer, you will have to modify the environment variableTEST_SF_CREDS to point to the path of the JSON file. If you are using VSCode, you can add the below entry under settings.json file.
Configuring go.test timeout
You can run go tests, but before that, keep a timeout of 300s or higher. If you are using vscode, the default timeout is 60s, which will make the test fail. In vscode, change the settings.json to have an entry"go.testTimeout": "300s"
You are all set! Start testing the code and contributing!