Prerequisites
To connect Snowflake to PeerDB, you need a Snowflake account with the appropriate permissions to create a user and warehouse for PeerDB. We have provided a script that you can use to create a user and warehouse for PeerDB. The script also creates a role and grants the role the appropriate permissions to access the warehouse and database.Setup Roles and Permissions
Setup Warehouse
You can choose to create an exclusive warehouse for PeerDB or use an existing warehouse:
- (Recommended) You can create and use an exclusive warehouse for PeerDB. PeerDB operations will never contend with your queries for resources. You will have to pay the cost of running the warehouse.
- You can use a shared warehouse to reduce your warehouse running cost. PeerDB operations may have to contend with your queries for the shared resources.
Warehouse Setup
Depending on whether you want to create a new warehouse or use a shared warehouse, do either of the following:
- If you want to create a new exclusive warehouse, don’t make any changes to the
PEERDB_WAREHOUSEvalue in the script - If you want PeerDB to use a shared warehouse to process source queries, change the
PEERDB_WAREHOUSEvalue in the script to the name of the shared warehouse
Role, User and Database Setup
Replace the default
PEERDB_ROLE, PEERDB_DATABASE, PEERDB_USER, and PEERDB_5TR0NG_P455W0RD values with values that conform to your specific naming conventions for those resources.Roles and Permissions
- Log in to your Snowflake data warehouse.
- Copy the following script to a new worksheet and edit as needed (to add schemas).
Setup PeerDB Role
Setup Key-pair Authentication (Required)
Generate Private Key
Generate a private key (
rsa_key.p8). You can generate an encrypted version of the private key or an unencrypted version of the private key.Generate Unencrypted Key-pair
Generate Unencrypted Key-pair
To generate an unencrypted version, you can execute the following commands:
Generate Encrypted Key-pair
Generate Encrypted Key-pair
To generate an encrypted keypair, execute the command:You will be prompted to enter a password. Choose a strong one, and don’t forget to note it down!You can also use different algorithms instead of the recommended
AES256 if needed. PeerDB supports the following alternative algorithms:AES128DES3
Generate Public Key
From the command line, generate the public key (
rsa_key.pub) by referencing the private key. Execute the commandAssign Public Key
Assign the public key to the Snowflake user. In a Snowflake worksheet, execute the commandRefer to this doc for more details.
Configure PeerDB
To get the Snowflake
The account identifier is case insensitive.
account_id, you can either get it via a query or from the Snowflake UI:Account ID via SQL Query
Account ID via SQL Query
To get the Snowflake remove
account_id, run the following query in Snowflake worksheet:.snowflakecomputing.com from the output of the above query to get the account identifier.Example in lixxxxx.us-east-1.snowflakecomputing.com, you want to use lixxxxx.us-east-1 as the account identifier.Account ID via Snowflake Web Interface
Account ID via Snowflake Web Interface
Open the account selector form the bottom left of the Snowflake Web Interface and click the Copy icon as below:
.) in the account identifier with hyphens (-).Example, in AB1234.XYZ987, you want AB1234-XYZ987PeerDB UI
In the PeerDB UI, after selecting Snowflake as the source, you can configure the connection details as follows: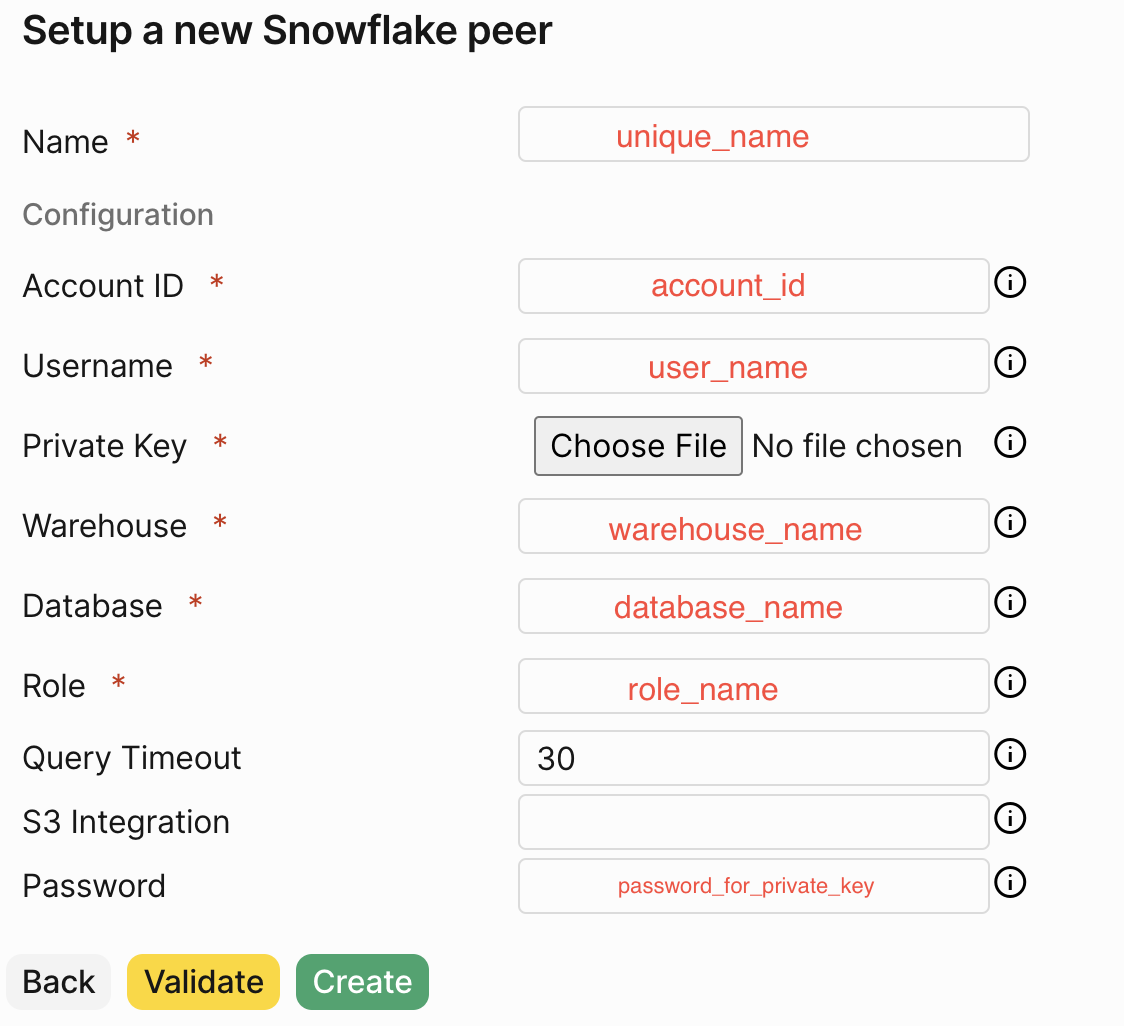
PeerDB SQL
In the PeerDB SQL interface, you can create a peer to Snowflake using the following command:Considerations
- Database Specific: PeerDB only supports querying tables within a database. Cross database joins are not supported yet.
- Supported Datatypes: All string, numeric and timestamp based datatypes are supported for querying.
- SQL Coverage: Most SQL constructs in reads incl. Simple Selects, JOINs, aggregations, window functions, CTEs etc are supported. You can run both Postgres compatible and SF compatible queries through PeerDBs interface.
- Error Handling: If a query fails on the Snowflake side because of lack of auth or query coverage or timeout, PeerDB handles that error and propagates the entire message as a JSON text to the end-user. We also capture this ERROR message within PeerDB logs.