> ## Documentation Index
> Fetch the complete documentation index at: https://docs.peerdb.io/llms.txt
> Use this file to discover all available pages before exploring further.
# Snowflake Setup Guide
Snowflake as a destination is deprecated and no longer actively maintained. It remains fully functional and no code is currently being removed. For new mirrors, we recommend ClickHouse, ClickHouse Cloud, or Postgres as the destination.
## Prerequisites
To connect Snowflake to PeerDB, you need a Snowflake account with the appropriate permissions to create a user and warehouse for PeerDB.
We have provided a script that you can use to create a user and warehouse for PeerDB. The script also creates a role and grants the role
the appropriate permissions to access the warehouse and database.
## Setup Roles and Permissions
You can choose to create an exclusive warehouse for PeerDB or use an existing warehouse:
1. (Recommended) You can create and use an exclusive warehouse for PeerDB. PeerDB operations will never contend with your queries for resources. You will have to pay the cost of running the warehouse.
2. You can use a shared warehouse to reduce your warehouse running cost. PeerDB operations may have to contend with your queries for the shared resources.
Depending on whether you want to create a new warehouse or use a shared warehouse, do either of the following:
1. If you want to create a new exclusive warehouse, don't make any changes to the `PEERDB_WAREHOUSE` value in the script
2. If you want PeerDB to use a shared warehouse to process source queries, change the `PEERDB_WAREHOUSE` value in the script to the name of the shared warehouse
Replace the default `PEERDB_ROLE`, `PEERDB_DATABASE`, `PEERDB_USER`, and `PEERDB_5TR0NG_P455W0RD` values with values that conform to your specific naming conventions for those resources.
Do not use the actual value of `PEERDB_USER` for any other purpose.
1. Log in to your Snowflake data warehouse.
2. Copy the following script to a new [worksheet](https://docs.snowflake.com/en/user-guide/ui-worksheet.html) and edit as needed (to add schemas).
```sql Setup PeerDB Role theme={null}
begin;
-- create variables for user / password / role / warehouse / database (needs to be uppercase for objects)
set role_name = 'PEERDB_ROLE';
set user_name = 'PEERDB_USER';
set user_password = 'PEERDB_5TR0NG_P455W0RD';
set warehouse_name = 'PEERDB_WAREHOUSE';
set database_name = 'YOUR_DATABASE';
set internal_schema = '_PEERDB_INTERNAL'; -- do not change this value
-- change role to securityadmin for user / role steps
use role securityadmin;
-- create role for peerdb
create role if not exists identifier($role_name);
-- create a user for peerdb
create user if not exists identifier($user_name)
password = $user_password
default_role = $role_name
default_warehouse = $warehouse_name;
-- grant the role to the peerdb user
grant role identifier($role_name) to user identifier($user_name);
-- change role to sysadmin for warehouse / database steps
use role sysadmin;
-- Only perform this step if you want to create a
-- dedicated warehouse for peerdb (recommended)
create warehouse if not exists identifier($warehouse_name)
warehouse_size = xsmall
warehouse_type = standard
auto_suspend = 60
auto_resume = true
initially_suspended = true;
-- change role to accountadmin to grant permissions
use role ACCOUNTADMIN;
-- grant peerdb role access to warehouse
grant usage on warehouse identifier($warehouse_name)
to role identifier($role_name);
-- grant peerdb access to database
grant usage on database identifier($database_name)
to role identifier($role_name);
use database identifier($database_name);
-- create peerdb internal schema and give all permissions to peerdb role
create schema if not exists identifier($internal_schema);
grant all on schema identifier($internal_schema) to role identifier($role_name);
grant create table on schema identifier($internal_schema) to role identifier($role_name);
-- add a statement like this one for each schema you want to have accessed by peerdb
-- EXAMPLE: grant usage on schema PUBLIC to role identifier($role_name);
grant usage on schema to role identifier($role_name);
-- add statements granting select permissions and create table permissions
-- EXAMPLE: grant create table on schema PUBLIC to role identifier($role_name);
grant create table on schema to role identifier($role_name);
commit;
```
Run the script. Make sure to select the **All Queries** checkbox.
Log in as the newly created user and verify that the schemas to sync to are visible in the Snowflake UI.
## Setup Key-pair Authentication (Required)
Open the command line in a terminal window.
Generate a private key (`rsa_key.p8`). You can generate an encrypted version of the private key or an unencrypted version of the private key.
To generate an unencrypted version, you can execute the following commands:
```bash theme={null}
openssl genrsa 2048 | openssl pkcs8 -topk8 -inform PEM -out rsa_key.p8 -nocrypt
```
To generate an encrypted keypair, execute the command:
```bash theme={null}
openssl genrsa 2048 | openssl pkcs8 -topk8 -v2 AES256 -inform PEM -out rsa_key.p8
```
You will be prompted to enter a password. Choose a strong one, and don't forget to note it down!
You can also use different algorithms instead of the recommended `AES256` if needed. PeerDB supports the following alternative algorithms:
* `AES128`
* `DES3`
From the command line, generate the public key (`rsa_key.pub`) by referencing the private key. Execute the command
```bash theme={null}
openssl rsa -in rsa_key.p8 -pubout -out rsa_key.pub
```
Assign the public key to the Snowflake user. In a Snowflake worksheet, execute the command
You must replace the `` value with the string between the `-----BEGIN PUBLIC KEY----- and -----END PUBLIC KEY-----` statements.
Exclude the `-----BEGIN PUBLIC KEY-----` and `-----END PUBLIC KEY-----` parts of the string.
Apart from that, multiple lines in the public key are fine.
```sql theme={null}
BEGIN;
use role accountadmin;
alter user set rsa_public_key='';
COMMIT;
```
Refer to this [doc](https://docs.snowflake.com/en/user-guide/key-pair-auth#configuring-key-pair-authentication) for more details.
## Configure PeerDB
To get the Snowflake `account_id`, you can either get it via a query or from the Snowflake UI:
To get the Snowflake `account_id`, run the following query in Snowflake worksheet:
```sql theme={null}
select t.value:host || '' snowflake
from table(flatten(parse_json(system$whitelist()))) t
where t.value:type = 'SNOWFLAKE_DEPLOYMENT'
```
remove `.snowflakecomputing.com` from the output of the above query to get the account identifier.
Example in `lixxxxx.us-east-1.snowflakecomputing.com`, you want to use `lixxxxx.us-east-1` as the account identifier.
Open the account selector form the bottom left of the Snowflake Web Interface and click the Copy icon as below:
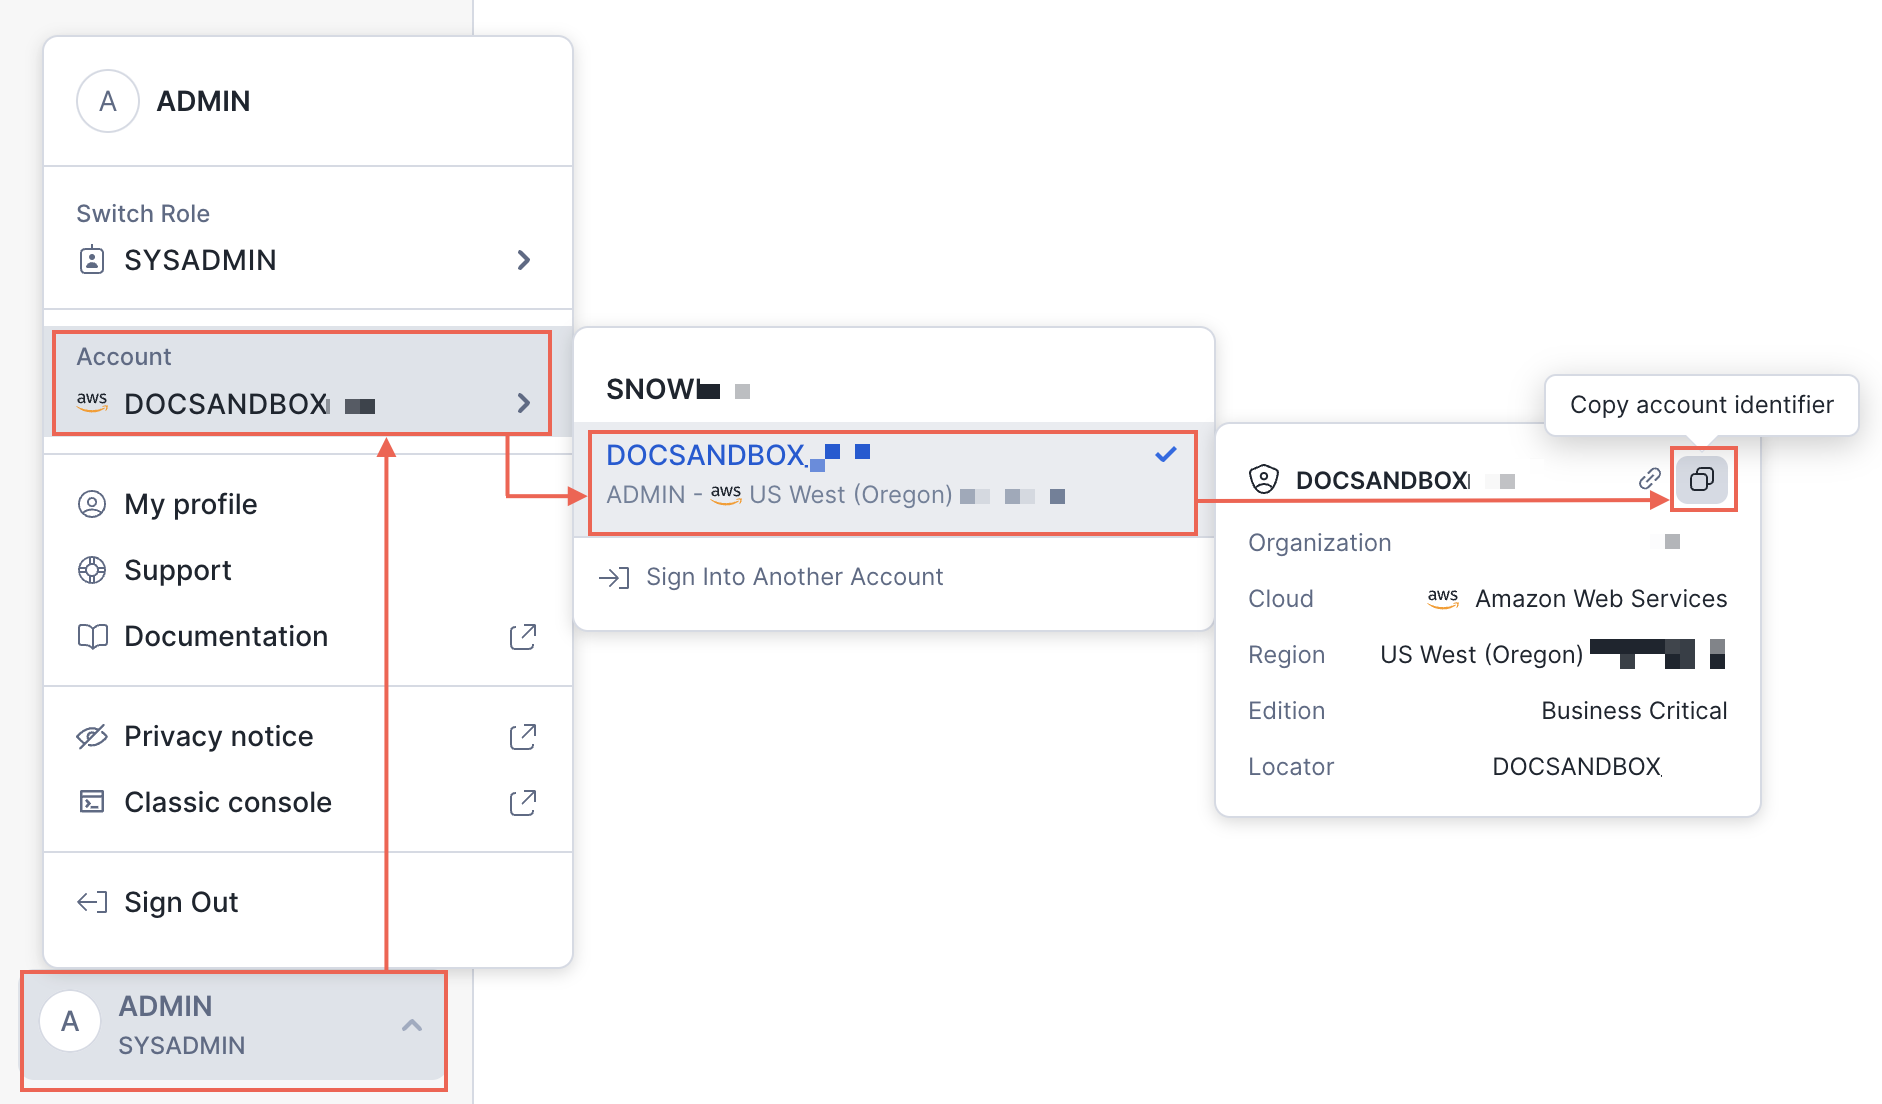 Replace any dots (`.`) in the account identifier with hyphens (`-`).
Example, in `AB1234.XYZ987`, you want `AB1234-XYZ987`
The account identifier is case insensitive.
### PeerDB UI
In the PeerDB UI, after selecting Snowflake as the source, you can configure the connection details as follows:
`password` is NOT the account password. It is the password used to encrypt the
private key, if using an encrypted private key.
Replace any dots (`.`) in the account identifier with hyphens (`-`).
Example, in `AB1234.XYZ987`, you want `AB1234-XYZ987`
The account identifier is case insensitive.
### PeerDB UI
In the PeerDB UI, after selecting Snowflake as the source, you can configure the connection details as follows:
`password` is NOT the account password. It is the password used to encrypt the
private key, if using an encrypted private key.
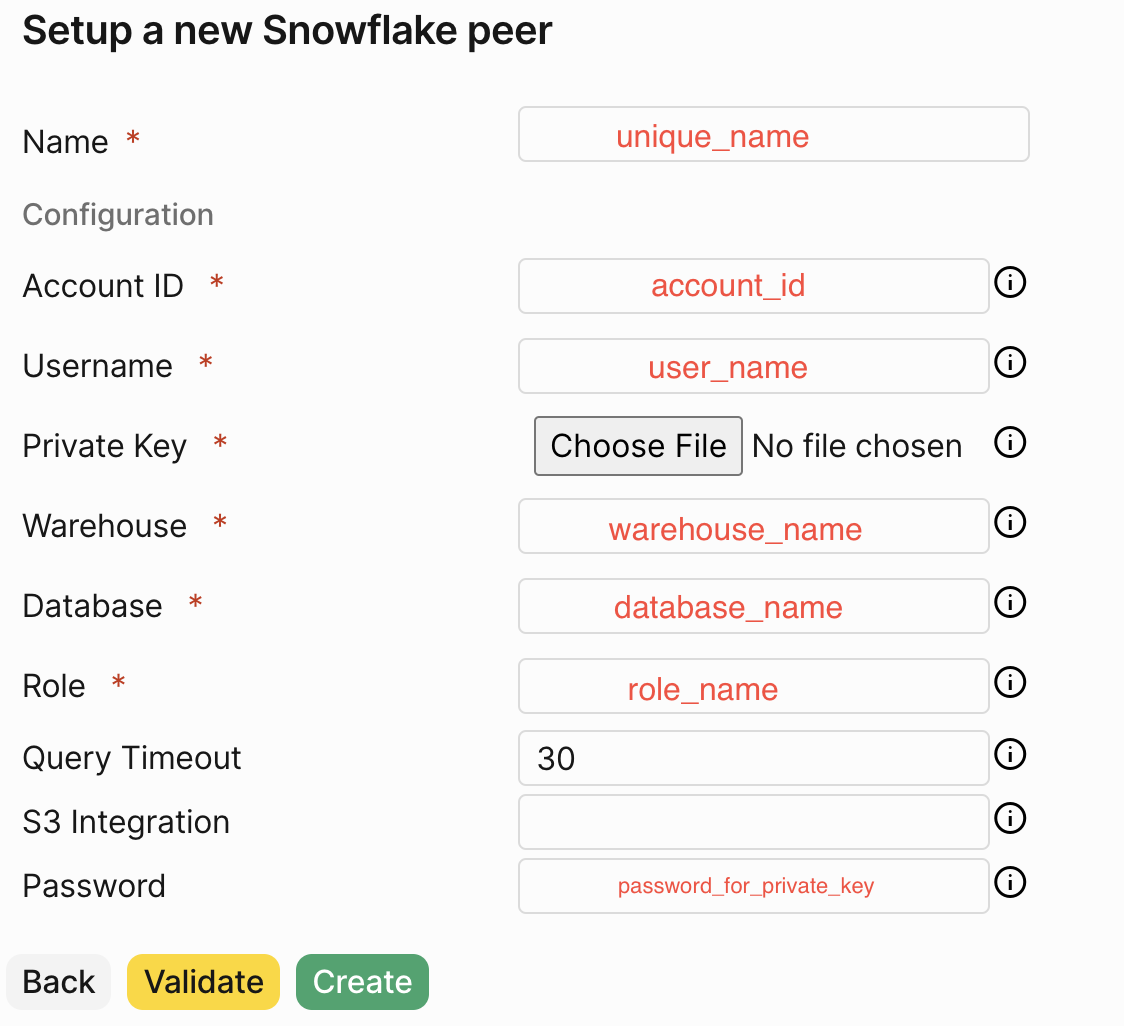 Validate the connection and create the Peer!
### PeerDB SQL
In the PeerDB SQL interface, you can create a peer to Snowflake using the following command:
`password` is NOT the account password. It is the password used to encrypt the
private key, if using an encrypted private key.
```sql theme={null}
CREATE PEER snowflake_peer FROM SNOWFLAKE WITH
(
account_id = '',
username = '',
private_key ='',
password = '' -- only provide when the private key is encrypted
database = '',
schema = '', -- default schema (most likely PUBLIC)
warehouse = '',
role = ''
);
-- Query away tables in Snowflake
SELECT * FROM sf_peer..;
```
### Considerations
1. **Database Specific:** PeerDB only supports querying tables within a database. Cross database joins are not supported yet.
2. **Supported Datatypes:** All string, numeric and timestamp based datatypes are supported for querying.
3. **SQL Coverage:** Most SQL constructs in reads incl. Simple Selects, JOINs, aggregations, window functions, CTEs etc are supported. You can run both Postgres compatible and SF compatible queries through PeerDBs interface.
4. **Error Handling:** If a query fails on the Snowflake side because of lack of auth or query coverage or timeout, PeerDB handles that error and propagates the entire message as a JSON text to the end-user. We also capture this ERROR message within PeerDB logs.
Validate the connection and create the Peer!
### PeerDB SQL
In the PeerDB SQL interface, you can create a peer to Snowflake using the following command:
`password` is NOT the account password. It is the password used to encrypt the
private key, if using an encrypted private key.
```sql theme={null}
CREATE PEER snowflake_peer FROM SNOWFLAKE WITH
(
account_id = '',
username = '',
private_key ='',
password = '' -- only provide when the private key is encrypted
database = '',
schema = '', -- default schema (most likely PUBLIC)
warehouse = '',
role = ''
);
-- Query away tables in Snowflake
SELECT * FROM sf_peer..;
```
### Considerations
1. **Database Specific:** PeerDB only supports querying tables within a database. Cross database joins are not supported yet.
2. **Supported Datatypes:** All string, numeric and timestamp based datatypes are supported for querying.
3. **SQL Coverage:** Most SQL constructs in reads incl. Simple Selects, JOINs, aggregations, window functions, CTEs etc are supported. You can run both Postgres compatible and SF compatible queries through PeerDBs interface.
4. **Error Handling:** If a query fails on the Snowflake side because of lack of auth or query coverage or timeout, PeerDB handles that error and propagates the entire message as a JSON text to the end-user. We also capture this ERROR message within PeerDB logs.